Getting Started
Break-In Period
Your subwoofer gets better with use. While it’s tempting to crank up the bass right away, it’s best to start at a lower volume and slowly increase it over the first 10-20 hours. This helps the new parts loosen up and deliver richer bass over time.
What's Included
Your Hidden Subwoofer X1 or Sideboard Subwoofer S1 comes with…
- Subwoofer
- 3′ Power Cord
- 6′ RCA Cable
- 4 x Rubber Feet
- 4 x Carpet Spikes
- Rubber Coaster
- Getting Started Guide
Locations
Finding the right spot for your subwoofer ensures the best bass experience. Here’s a guide tailored to your specific concerns:
- Directionality: Bass, especially at low frequencies, is non-directional. While placing the subwoofer near your TV or audio source is a common choice, you might find that positioning it on a different wall gives satisfactory, if not superior, results.
- Cable Connections: Your subwoofer requires power and audio connections. Ensure you choose a spot where you can conveniently connect both the power cord and the RCA cables to your audio source, whether that be a TV, sound bar, or audio receiver.
- Corner vs. Open Wall: A corner placement can amplify the bass, making it louder. However, this might sacrifice clarity. An open wall placement is often ideal for a more transparent sound.
- Avoid Rattles: Some subwoofer positions may cause items in your room to rattle, detracting from your listening experience. If you encounter this, it’s worth experimenting with different placements.
- Floor Type: Different floors affect bass differently. Hardwood, tile, cement, and carpet each have their unique characteristics. If possible, try your subwoofer in different areas to see which floor type gives you the sound you prefer.
Experimentation is key. Given the unique acoustics of every room and personal preferences, it’s worthwhile to invest time in finding the perfect spot for your subwoofer.
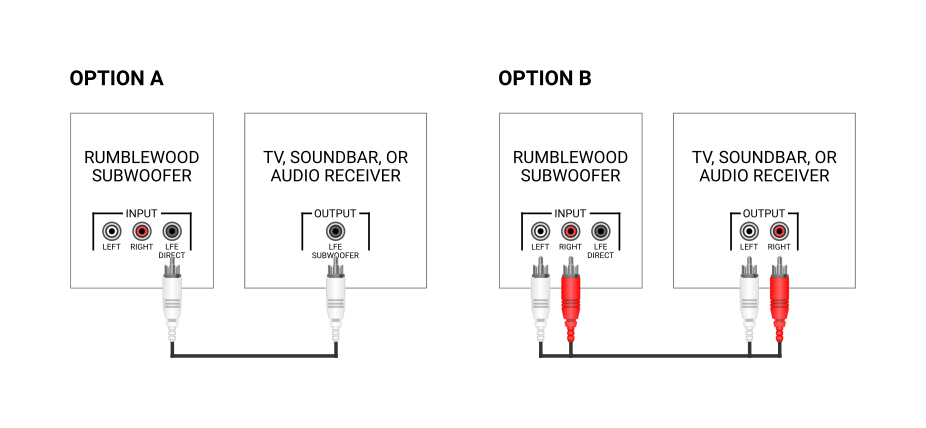
Connections
Installing the Feet
Your subwoofer is designed to adapt to various floor types to ensure optimal performance and protection. Here’s a guide on utilizing the included feet:
- Rubber Feet: Ideal for hardwood, tile, and concrete floors. The rubber feet provide stability and prevent potential damage or scratching on such surfaces.
- Carpet Spikes: For carpeted areas, make use of the carpet spikes. These penetrate the carpet, ensuring the subwoofer remains stable and provides a clearer bass response.
Install the appropriate feet by screwing each foot fully into each of the four legs. If the subwoofer isn’t level or rocks, unscrew the appropriate feet to correct.
Tuning
Achieving the perfect bass tone that complements your room and audio setup is a blend of art and science. Here are some key tuning adjustments to help you find that sweet spot:
### Adjusting the Low-Frequency Cutoff:
Every subwoofer comes with a control setting that allows you to adjust the low-frequency cutoff. This essentially sets the lowest frequency your subwoofer will reproduce.
1. **How to Adjust**: Usually, there’s a knob or dial on the subwoofer labeled ‘crossover’ or ‘frequency’. Turn this to set the desired frequency cutoff.
2. **Effects of Setting It Too Low**: If you set the cutoff too low, the subwoofer may miss out on some mid-bass frequencies. This might make the bass sound thin or lacking in fullness, especially when paired with smaller speakers that can’t handle these frequencies.
3. **Effects of Setting It Too High**: If the cutoff is set too high, the subwoofer may overlap with your main speakers, causing a boomy or muddled sound. It can also make the bass source seem less localized, leading to a less natural audio experience.
A general rule of thumb is to set the cutoff at a frequency that’s just below where your main speakers stop producing bass, ensuring a seamless audio transition. However, this varies based on your specific speakers and room acoustics.
### Auto-Calibration:
Modern audio systems, especially AV receivers, offer an auto-calibration feature. This utilizes an included microphone to measure the sound output in your room and automatically adjusts the settings for the best audio experience.
1. **How to Use**: Place the microphone at your usual listening position. Connect it to your audio source and follow the on-screen or manual instructions to initiate the auto-calibration process.
2. **Benefits**: The auto-calibration feature takes the guesswork out of the tuning process. It accounts for room acoustics, furniture placement, and other factors to deliver an optimized audio experience tailored to your space.
We highly recommend using this feature if your audio source supports it, as it provides a sound profile that’s custom-fitted to your listening environment.
Remember, while these tuning recommendations are based on general principles, the best sound is subjective and depends on individual preferences. Feel free to experiment and trust your ears!
Troubleshooting
Encountering issues with your subwoofer? Here’s a quick guide to help you address some common problems:
### 1. **No Sound or Low Volume**:
– **Check Power**: Ensure the subwoofer is turned on, and the power cord is securely plugged into a working outlet.
– **Volume Settings**: Make sure the volume or gain control on the subwoofer isn’t set too low.
– **Receiver/Amplifier Settings**: Confirm that the connected audio source (like a receiver or amplifier) hasn’t muted the subwoofer or set its volume too low.
– **Cable Connections**: Verify that the RCA cables are securely connected. If using both left and right RCA inputs, ensure both cables are properly plugged in. For LFE input, only one cable is needed.
### 2. **Distorted or Muddled Sound**:
– **Crossover Settings**: Adjust the low-frequency cutoff as discussed in the ‘Tuning’ section. A wrongly set cutoff can lead to sound overlap, causing distortion.
– **Cable Quality**: A damaged or poor-quality RCA cable can degrade sound quality. Try swapping out the cable to see if that resolves the issue.
### 3. **Intermittent Sound or Dropouts**:
– **Cable Check**: Loose or damaged cables can cause intermittent sound. Ensure they’re securely connected and consider replacing if they show signs of wear.
– **Interference**: Other electronic devices or wireless signals might interfere with your subwoofer. Try moving other electronic devices away from the subwoofer or change its position.
### 4. **Subwoofer is Too Boomy**:
– **Room Position**: The position of your subwoofer in the room can greatly affect its sound profile. Try shifting its location, especially if it’s currently in a corner.
– **Tuning**: Revisit the low-frequency cutoff settings or consider running an auto-calibration if your receiver supports it.
### 5. **Using LFE but No Sound**:
– **Source Settings**: Ensure the audio source is sending the low-frequency effects (LFE) channel to the subwoofer. Some devices may have settings that direct LFE to main speakers instead.
– **Single Cable Check**: Remember, when using the LFE input, only one RCA cable is required. Double-check it’s securely connected.
—
If the issue persists after trying these solutions, it’s a good idea to consult the product manual or contact our customer support team for further assistance. Your listening experience is our priority, and we’re here to help!
Power
Your high-end subwoofer deserves consistent and clean power for optimal performance:
- Wall Outlet: While plugging directly into a wall outlet is possible, fluctuations in your home’s power could affect the subwoofer’s performance.
- Power Conditioner: For a cleaner power supply and to eliminate potential electrical noise, a power conditioner is a wise choice. It also offers valuable surge protection.
- Surge Protector: At the very least, ensure your subwoofer is connected to a quality surge protector to guard against unexpected power spikes.
Proper power management not only enhances audio quality but also ensures the longevity of your investment.
Caring for Your Subwoofer
Your subwoofer’s cabinet, whether a stained wood or enamel paint finish, is a testament to craftsmanship. To maintain its appearance and ensure longevity, here’s a guide on care and a few dos and don’ts:
1. Dusting: Use a soft, lint-free cloth to gently wipe away dust. For the wood finish, always follow the grain direction.
2. Cleaning: For fingerprints or smudges, dampen a cloth with a mixture of mild soap and water. Wring it out well, so it’s barely damp, and gently clean the surface. Dry immediately with a soft cloth.
3. Avoid Harsh Chemicals: Never use strong solvents or abrasive cleaners. They can harm the finish, causing it to peel or discolor.
Some dos and don’ts…
– Do use the provided rubber coaster to reduce vibration notices when placing things on top of the subwoofer
– Avoid placing the subwoofer in direct sunlight as this can fade or discolor the finish.
– Do not place hot objects directly on the cabinet. The extreme heat can damage the finish.
– Do ensure adequate ventilation around the subwoofer. Though it’s designed to dissipate heat, giving it some breathing room helps.
The attention to detail in your subwoofer’s design deserves the same care in its upkeep. Treating it right ensures that it remains both a visual and auditory centerpiece for years to come.